How to Clean your Freshwater Aquarium
Every aquarist, from beginner to advanced, has to deal with keeping an aquarium clean. The exact process varies a little depending on how large your tank is, how many fish you have, and how good your technological additions are.
But we can generalize the process with the following steps: cleaning the aquarium glass, filter maintenance, gravel vacuuming, and water changes. So let’s talk a little about how to clean your freshwater aquarium in an efficient manner!
Cleaning the Aquarium Glass
Keeping the viewing glass clean is one of the most frequent maintenance tasks aquarists engage in. Since tank water is full of fish, micro organisms, light, and nutrients, stuff is bound to accumulate on any hard surface over time.
The two most common growths to watch out for are algae and bacterial biofilms. Algae will have a strong color tint; typically green but not always. Brown algae (diatomaceous algae) is also common, particularly in tanks with high levels of dissolved silicates. Blue-green algae is a more troublesome kind but it is also the easiest to remove. It forms thin sheets on the substrate and decorations that are loose enough to be peeled away by hand or sucked free using a gravel vacuum.
Microbial biofilm is usually clear but it can also be cloudy or faintly colored any shade. New aquarists may find both to be concerning but neither one is truly a problem. So long as they don’t grow out of control, algae and biofilm are both signs of a healthy, thriving ecosystem that’s members and nutrient flow are in balance with one another. That said, we sometimes need to help that balance remain intact by scrubbing excess algae and biofilm from the glass and decorations.
Glass versus Plastic/Acrylic Tanks
Something to keep in mind is that glass and acrylic tanks have very different care requirements. Glass is a very hard substance and as a result you can use box cutters, scrubbing pads, or anything else you have on hand to remove algae and biofilm.
But acrylic and other plastic aquariums have walls that are much softer than glass. While they are rigid and strong, plastics are easily scratched. An algae pad rated for glass will leave hairline scratches on the glass that are impossible to remove.
Hard Water Deposits
Another thing to look out for is lime scale along the water line. Hard, alkaline water is full of dissolved minerals. Most tap water in the USA tends to be hard and these minerals end up in your aquarium water.
As water evaporates from the tank you will see a faint deposit of lime that will grow increasingly thick if you don’t remove it in between water changes. By catching it early, a deposit of lime scale may be thin enough that you can wipe it away with a finger or algae scrubber. Thicker deposits will need to be scraped away with a razor blade. You may need to pre soften them with vinegar or other weak acid in order to chip away at them.
Water lost due to evaporation also needs to be replaced. Ideally, you are topping off your tank before less than 10% of the water is lost. Remember that while water evaporates into the air the chemicals dissolved within it do not. A 10% decrease in water volume is a 10% increase in dissolved minerals, ammonia, nitrate, and other compounds. While nitrogenous waste can be processed by beneficial bacteria, dissolved minerals and salts need to be removed via water changes.
Filter Maintenance
The next step in cleaning your freshwater aquarium is keeping track of the filter and maintaining as needed. Since filters run continuously they pick up a steady stream of leftover food, fish feces, and other floating debris that clogs the floss media. This mechanical filtration action is helpful but if too much matter clogs your media then water flow into the unit is hampered.
If you are using artificial media like plastic or foam that doesn’t decay then you can simply rinse the media and reuse it. However, it’s always better to rinse the media out in a small container of aquarium water. Do not run media under the faucet to clean it; tap water is chlorinated in order to kill bacteria. And the last thing we want to do is sterilize our filter floss of all the beneficial microorganisms living within it.
Any chemical media (zeolite resin, activated carbon, etc) will also need to be changed. Usually this means removing it entirely, replacing it with fresh media. However, some specialty media are rechargeable, including ammonia and phosphate-absorbing resins.
Activated carbon is by far the most common type of chemical media; all it needs is a quick soak before being added to the tank. We do this in order to remove the fine dust that builds up within the carbon pores. This dust isn’t toxic but it can be irritating to fish gills in large amounts.
Biological filtration media like biofoam, lava rocks, or ceramic rings should be left alone unless they have developed too much brown mulm and bacteria. By “too much,” I mean the outflow of the filter is being affected. A coating of bacteria is a good thing on biological media so we never want to rinse it unless absolutely necessary. And even then, just enough of a rinse to restore flow through the filter chambers!
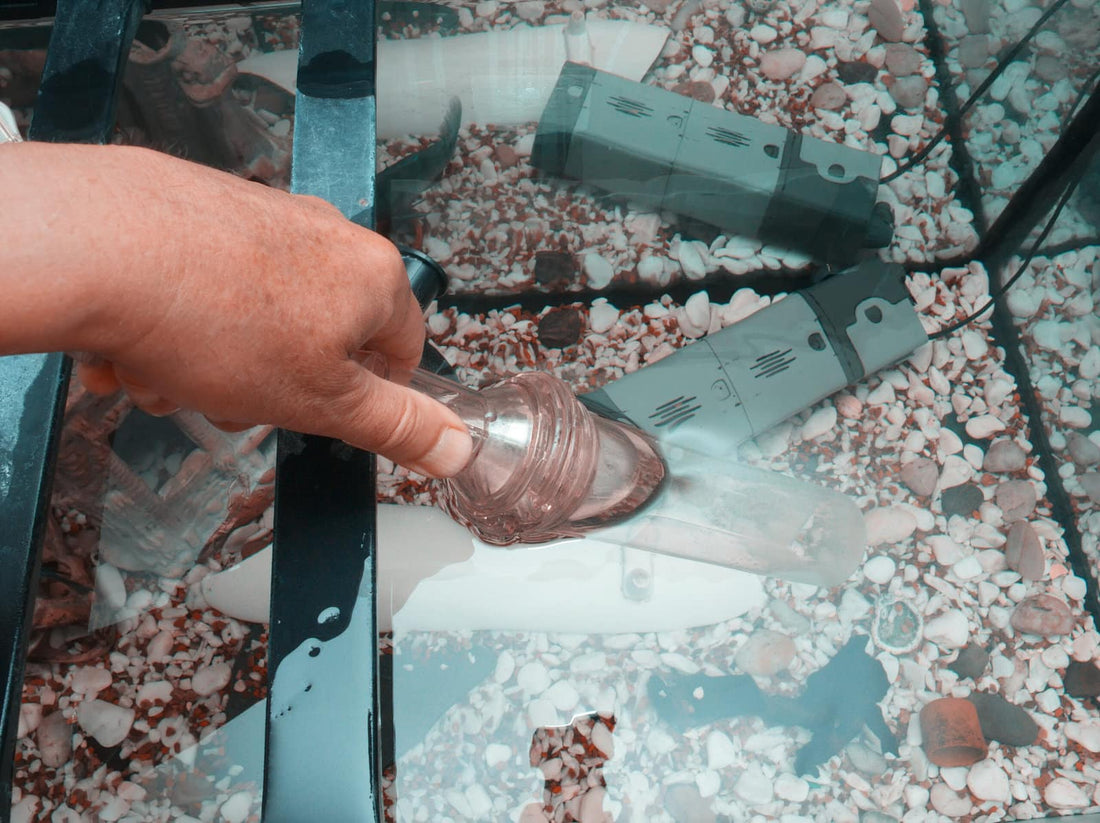
Vacuuming the Aquarium Bottom
The third and most time consuming step is vacuuming the aquarium bottom. Since most tanks have a substrate of sand or gravel you’ll need to make sure you remove as much of the accumulated debris from between the grains as possible.
How often we vacuum the aquarium bottom depends on your fish load, how effectively waste gets transported to the filter, the substrate type, and other factors. But once or twice per month is a good average for the majority of aquarists!
An aquarium gravel vacuum is something you can go cheap or expensive on. Cheaper vacuums cost less than $10, depending on their length and require that you have a nearby drain or are ready to haul some buckets. For larger aquariums, this can become a time-consuming hassle.
Adding Fresh Water to the Aquarium
Adding clean water to the aquarium is the last step and gets you that much closer to being able to sit and enjoy the view. However, we need to be careful because this step can actually be dangerous to fish if not done properly.
For starters, we need to be aware of the potential for water chemistry and temperature shocks. Tap water is as hot or as cold as you set the faucet to while your aquarium typically sits at a very narrow temperature range all year round. Sudden shifts of more than 5℉ can be stressful and up to 10℉ can even be fatal for sensitive fish.
If you have a thermometer on hand, use it to ensure the water coming from your faucet is within range of your normal aquarium parameters. You don’t need to be super precise if you’re performing 10-25% water changes. But if you’re doing heavy water changes of 50% or more, you can make the impact less stressful by ensuring the temperature of your clean water is within 5℉.
Tap water chemistry can also be a source of stress. The vast majority of aquarium fish either prefer neutral to alkaline water conditions (pH 7.0+) or have adapted by being captive bred in them for generations. However, if you are trying to breed certain fish then you may have additives like Indian Almond leaves or driftwood in the tank. These additions help decrease the pH by adding humic acids to the water. Suddenly shifting the pH back towards basicity with loads of tap water can cause wild chemistry shifts that are harmful.
Lastly, never forget to add dechlorinator to your incoming water. You can either add it to the buckets of fresh water or add the drops directly into the tank right before you start refilling. Dechlorinators work instantaneously and as long as you give the water a brief swirl to spread it around, it will detoxify chlorine compounds safely and effectively!
No comments
Featured Products


comments